This post may contain affiliate links. Please read our disclosure policy.
We’re sharing all of our tips and tricks to make the best Fried Boneless Skinless Chicken Breasts!

We love fried chicken – with its tender, juicy meat and crispy, seasoned breading. Fried Boneless Skinless Chicken Breasts are a delicious option if you want to make a sandwich, or if you simply want to eat fried chicken without worrying about the bones.
Normally, when you make fried chicken from pieces of a whole chicken with the skin still on, the skin really helps the breading stick to the pieces as they fry.

But how do you make the breading stay on a fried, boneless chicken breast without the skin?
After some trial and error – we discovered that three layers of a seasoned flour mixture – with a dip into an egg mixture in between – should do the trick.
You’ll start with thick boneless skinless chicken breasts. If the breast is thicker than an inch and a half, you’ll want to butterfly the breasts so it is a more even thickness. (This will help the fried chicken breast cook through more evenly.)
In a large bowl, whisk together flour, salt, pepper, garlic powder and paprika. In a second bowl, whisk together eggs, milk and some hot sauce.
Dip the boneless, skinless chicken breasts back and forth in this order: flour, egg, flour, egg, flour. Don’t worry if the breading starts to get a little ‘shaggy’ as you dip back and forth. Those little rough clumps of breading will fry up nice and crisp.
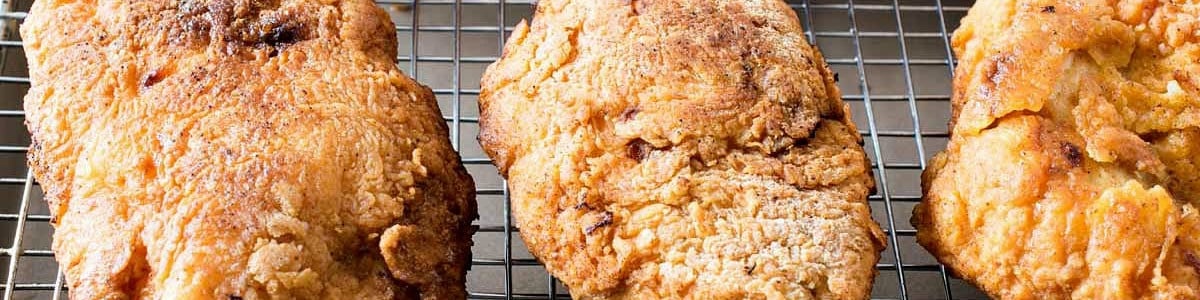
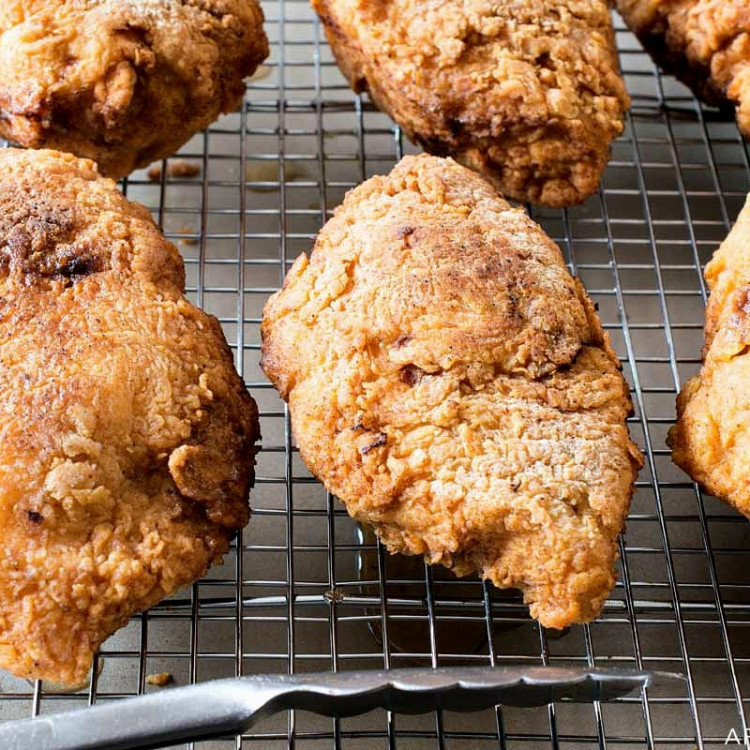
Gently place the coated chicken breasts on a plate – pressing the coating into the chicken to make sure it sticks. Repeat with the rest of your chicken breasts, then melt lard or shortening in a large heavy-bottomed pan such as cast iron or porcelain-coated cast iron braiser.
We recommend that you invest in a deep fry or candy thermometer (which are not at all expensive). This will help you know when your frying oil is at the proper temperature of 325 degrees F. (Don’t go higher, or the chicken will scorch on the outside before it is cooked through on the inside.)
Depending on the size of your pan, fry in batches – making sure that that chicken pieces are not overly crowded as they cook. Fry for about 15 minutes – carefully turning the chicken pieces every few minutes. Jack used two spatulas to flip the pieces, making sure not to disturb the nice, fried crust that formed as the chicken cooked.

How do I know when my Fried Boneless Skinless Chicken Breasts are cooked through?
The best way to tell is by using an instant-read probe thermometer. Carefully insert the thermometer into the breast and remove from the oil once the internal temperature reaches 155 degrees F. (The residual heat will continue to cook the chicken to a safe-to-eat internal temperature of 165 degrees F.)
Carefully place the Fried Boneless Skinless Chicken Breasts on a rack to drain and cool slightly – then serve immediately. The inside will be juicy and perfectly cooked through, and the coating will be nice and crispy!

You may enjoy these other chicken recipes:
- Buttermilk Fried Chicken
- Parmesan Chicken Cutlets
- Cheetos Chicken Strips
- Pan Seared Boneless Chicken Breasts
- Chicken Cordon Bleu
We love seeing what you made! Tag us on Instagram at @afamilyfeast or hashtag #afamilyfeast so we can see your creations!

Fried Boneless Skinless Chicken Breasts
How to make super juicy, fried chicken breasts with a delicious, crispy coating.
Ingredients
2 pounds boneless skinless chicken breasts
2 cups buttermilk*
2 cups all-purpose flour
2 teaspoons kosher salt
1 teaspoon white pepper
1 teaspoon garlic powder
1 teaspoon paprika
3 whole eggs
3 tablespoons whole milk
2 tablespoons hot sauce (we used Cholula which is a mild hot sauce)
Enough lard or vegetable shortening to come 2” up the side of a large cast iron skillet
Instructions
- Breasts pieces thicker than 1 ½ inches should be butterflied.
- Place chicken breasts in a zip lock bag and cover with the buttermilk and let soak in the refrigerator overnight or at least 12 hours.
- When ready to cook, drain the chicken and discard the buttermilk.
- In a large bowl, whisk flour, salt, pepper, garlic powder and paprika.
- In a medium bowl beat eggs, milk and hot sauce.
- Place the pieces, two at a time, in flour, egg, flour, egg and flour, pressing each time to coat. The breading should be rough and shaggy and not neat and even. The shaggy parts will crisp up as they fry and give a nice crunchy coat. As you bread each piece, place on a platter or plate.
- Place a rack over a sheet tray and set aside.
- Melt shortening in a large heavy bottomed pan, (a large cast iron or a coated cast iron pan works best), and hold at 325 degrees F using a candy thermometer or other thermometer to get to that temperature, no higher.
- Add all of the chicken at once, piece by piece. If they do not comfortably fit all at once, you will need to cook in two batches. The temperature of the oil will drop below 300 degrees F when you place the chicken pieces in and that is where you should keep it during the cooking. If the oil is too hot, the outside will get too dark before the inside cooks.
- Fry for a total of about 15 minutes, carefully turning every few minutes for even browning. (We used two heat-proof spatulas (silicone or metal) to make sure we did not disturb the nice crust forming). Insert a probe thermometer into one piece and remove from the fryer onto the prepared rack once the internal temperature reaches 155 degrees F. The chicken will continue to cook to a safe temperature of 165 degrees F.
- Be gentle when handling so that the cooked breading stays on.
- Serve immediately.
Last Step! Please leave a review and rating letting us know how you liked this recipe! This helps our business thrive & continue providing free recipes.
Notes
*If you don’t have buttermilk, in a pinch add one tablespoon of fresh lemon juice or white vinegar to every cup of whole milk. Let sit 15 minutes to curdle.


Best one I’ve come across in years, works to perfection re: chicken breasts
Thanks Travis!
I made this several months ago and now my family requests it at least twice a month! It’s moved into our regular meal rotation. Rather than butterfly thicker pieces, I marinate in the buttermilk, then beat flat with a rolling pin before coating and frying.
Thanks Connie – so glad your family enjoys the recipe!
I am looking very much forward to trying this as my teenage granddaughter is with me for two weeks and is a very picky eater but is requesting fried chicken off the bone. I was delighted to find your recipe. I do not have a cast iron skillet but do have an enamel cast iron braised pan. Since I haven’t done this befor do you think I could use that? I really want to make her a nice dinner that she wants. I will definitely rate the recipe once I make it. Seems easy and review are so good that I’m confident I can do this.
Thank you for your reply as soon as you can.
Terry
Hi Terry – Yes – an enamel cast iron braiser should work just fine! As the mom of a picky teen myself, I hope she loves the chicken!
first try: crust fell off but it was delicious. 15 minutes seems too long.
stars didn’t work but its a five
Thanks Nicholas – feel free to adjust the timing depending on the size of the chicken breasts. If you have a probe thermometer (an inexpensive cooking tool to invest in), that’s the best way to tell when your chicken is done.
That’s after reading through the recipes, but I have a question. I do most of the cooking in cast iron and I have a cast iron skillet with grill lines and I season my chicken breast with garlic salt and/or honey hickory, Montreal chicken seasoning, do you have any other ideas?
Hi Michael – You might enjoy our Pan-Seared Boneless Chicken Bread recipe (https://www.afamilyfeast.com/pan-seared-boneless-chicken-breasts/) or we also have a Marinated Grilled Chicken recipe that you can grill indoors (on that ribbed pan of yours) or outdoors (https://www.afamilyfeast.com/marinated-grilled-chicken/). In terms of seasoning blends, we’ve recently fallen in love with some of the Traegar brand rubs and spice mixes (we lightly seasoned skinless chicken breasts with them). This Pork and Poultry Rub is one of our long-time favorites (See it on Amazon here https://amzn.to/3qx0SC2) and we recently tried this Fin & Feather Rub that is also good and versatile: (https://amzn.to/43qFDjW) – there are a few others specifically for poultry too. Hope this helps!
Excellent
Thanks Lois!
Beautiful love it so much
Thanks Debra!
followed the recipe and it turned out perfectly!
Thanks Judy!
This recipe was delicious and easy. Made the best crispy chicken sandwiches! Will definitely add this to my cooking repertoire. Thank you!
You’re welcome Teresa – glad you enjoyed the recipe!
I made chicken breasts sandwiches and they turned out great. It was my first time making fried chicken. And I will be making them often now. Thanks
You’re welcome Sue! Glad you enjoyed the recipe!