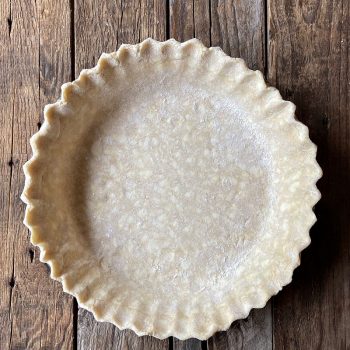
Learn how to make Perfect Pie Crust! It’s easy.

Full confession: For years, anytime I baked a pie, I would use the refrigerated, pre-made pie crusts from the supermarket. They were easy – plus, I had never found a really good, homemade pie crust recipe that I trusted – until now!
My husband Jack was never a fan of the store-bought crusts – too thin and often not large enough to fit completely into a deeper pie plate. And, when he tried some of the 5-star pie crust recipes he found online, many of them came out dry, flavorless, and not flaky enough. So, he set out to develop the Perfect Pie Crust recipe – and here it is!

Tips to make a Perfect Pie Crust
- Start with super cold butter. Why? Butter is a combination of milk fat and water. When the cold butter interacts with the heat of your oven, the water will create steam and that helps give your crust a flaky texture. To get our butter super cold, we slice the butter onto a parchment-lined plate, and place it in the freezer while we mix up the rest of the pie crust.

- Use a combination of both butter and vegetable shortening. Why? As noted above, the water in the butter helps yield a flakier pie crust. But the shortening has a higher melting point – which helps the crust hold its shape more than if you were using all butter.

What about taste? An all-butter crust will taste buttery, while an all-shortening pie crust will be more neutral (but still delicious). To get the best of both worlds, we recommend a mix of butter and shortening for our Perfect Pie Crust.
- Use a food processor (or pastry cutter or two forks) to mix your pie crust ingredients. Why? Aside from it being easier and quicker, you want to avoid warming the butter with the heat from your hands. Of course, you will need to use your hands at some point to form the pie crust into a ball, but work quickly!
- Use ice-cold water in your pie crust. Why? Once again, this goes back to keeping the butter in the crust as cold as possible so it will interact properly with the heat of the oven and produce steam as it bakes. (Steam = flaky pie crust.)
- Don’t over-mix your pie crust. Why? Over-mixing blends the fats (butter and shortening) into the flour and any hope of a flaky crust is eliminated because the dough cannot absorb water from the butter, and therefore is not able to produce steam. The dough should be shaggy in appearance and not completely mixed; you should still see small pieces of fat about rice-to-pea size. If you pinch some of the mixture with your fingers it will hold together.

Once you’ve mixed your dough, pour the mixture onto a piece of plastic wrap. Then use the plastic wrap to to shape it into a round disk. (This will help you avoid over-handling the dough with your hands.) Wrap tightly and refrigerate for at least one hour or longer. While the dough chills, the flour will have a chance to absorb more of the moisture from both the water, as well as the butter and shortening. Additionally, the butter will have a chance to chill again.
After the dough has chilled, unwrap and place on a well-floured countertop or pasty board. Dust your rolling pin with flour as well, and roll out from the center to the edges, turning the dough as you roll so it stays an even circle as it flattens.
Roll until the dough measures a couple of inches larger than your pie plate. (We rolled our dough out to 12 inches for a 10-inch pie plate.) Then use the rolling pin (as shown below) to carefully transfer the dough to the pie plate. Center the dough over the pie plate, then carefully press the dough down into the bottom of the dish. For a single crust pie, trim off any excess pie dough – leaving about a 1-inch overhang over the edge of the pie plate. For a two-crust pie, wait until the pie is filled and the top crust is in place before trimming off the excess.
Flute the edges of your pie crust (see photo below). Use the index finger knuckle and thumb of one hand and the index knuckle from the other and make a fluted edge all the way around.

At this point, fill or bake your Perfect Pie Crust according to your pie or quiche recipe instructions. If your pie recipe calls for a partially-baked pie crust, you might find our tutorial on How to Blind Bake a Pie Crust helpful.
You might enjoy these pie and quiche recipes:
- Lemon Blueberry Cream Pie
- Tomato Pie
- Spinach and Cheddar Quiche
- Toll House Chocolate Chip Pie
- Apple Custard Pie
Perfect Pie Crust
Learn how to make Perfect Pie Crust! It’s easy.
- Prep Time: 1 hour 30 minutes
- Total Time: 1 hour 30 minutes
- Yield: 1 pie crust 1x
- Category: Dessert
- Method: Baking
- Cuisine: American
Ingredients
6 tablespoons butter
2 1/2 tablespoons vegetable shortening
1 1/2 cups all-purpose flour
1/2 teaspoon salt
1 1/2 teaspoons granulated sugar
3–6 tablespoons ice cold water
Instructions
- Cut the butter and shortening into pieces and lay out on a dinner place and place in your freezer while you prepare the rest of the dough.
- In the bowl of a food processor, place flour, salt and sugar and pulse a few times to mix.
- Take the frozen butter and shortening and push the pieces down into the flour. Put the lid back on and pulse several times until the butter and shortening are rice-to-pea sized.
- Add 3 tablespoons of the ice-cold water and pulse a few times to mix. Open the cover and test by squeezing some dough together. If it crumbles, keep on adding a tablespoon of water at a time, pulse for a few seconds then test again. The resulting dough should be shaggy and not completely mixed and you should still be able to see bits of fat.
- Once it stays together in your hand when squeezed, pull off a big piece of plastic wrap and pour the mixture into the center.
- Then use the plastic wrap sides to push the mixture into a tight ball. Flatten into a round disc, wrap tightly and refrigerate for one hour before use. *See notes – dough may be refrigerated or frozen.
- After one or more hours, roll out on a well-floured surface, pushing any cracks together with your fingers. Don’t let it stick to the counter; add more flour to the counter if needed. Roll to 12 inches (for a 10-inch pie plate) across by pressing from the center out to the edges.
- To place in a pie plate, roll up on the rolling pin and unroll into the pie dish, gently pressing it into the dish and over the edge. For a single crust pie: Trim excess crust to one inch beyond the edge of the pie plate. For a pie with a top crust, trim after you’ve filled the pie and placed the top crust over the filling. Brush off any excess flour.
- Use the index finger knuckle and thumb of one hand and the index knuckle from the other and make a fluted edge all the way around.
- Bake according to your pie recipe instructions.
Notes
*The wrapped dough will keep up to five days refrigerated or two months frozen.
This recipe is for a single crust pie. If you are baking a pie with a top crust, double the recipe (or make it twice through).