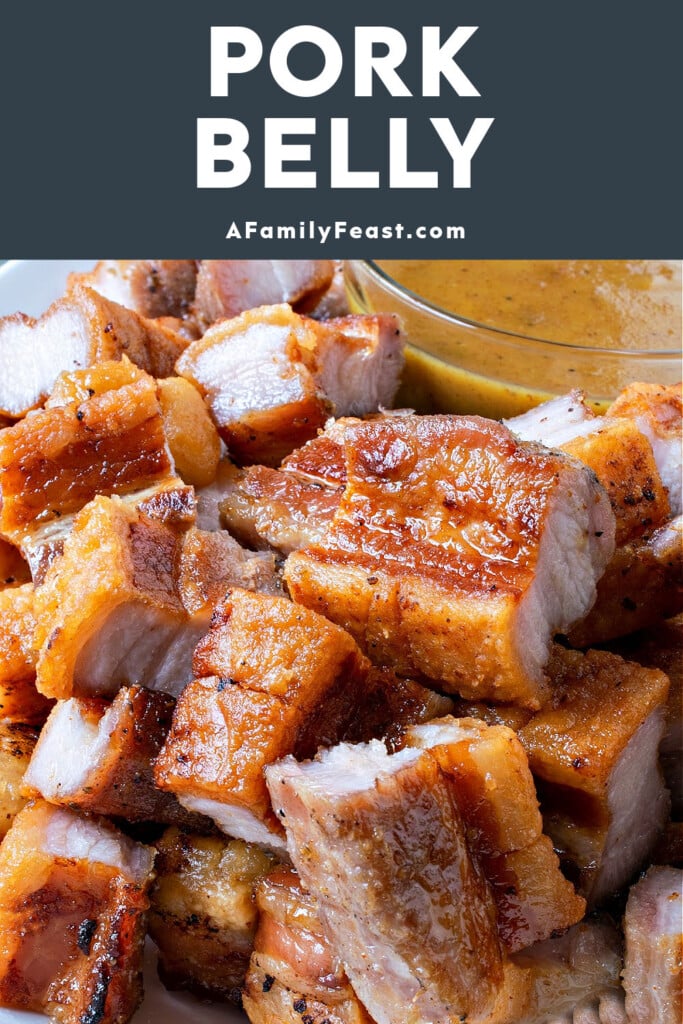
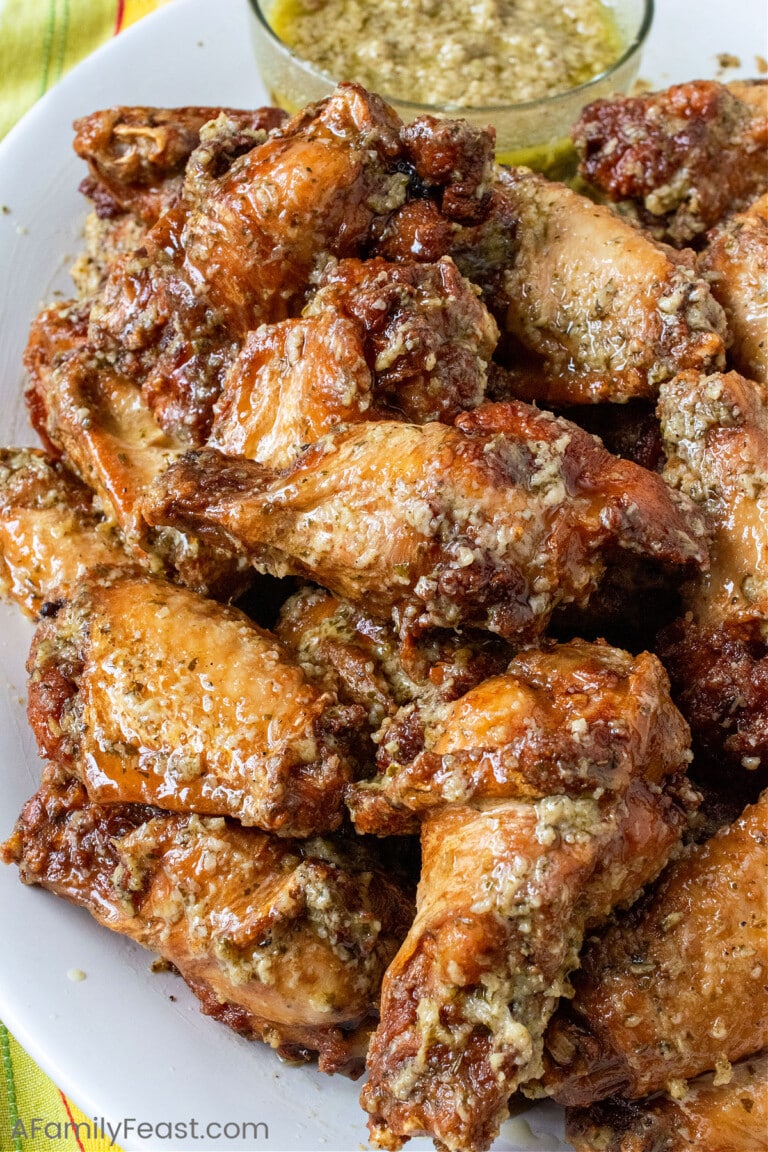
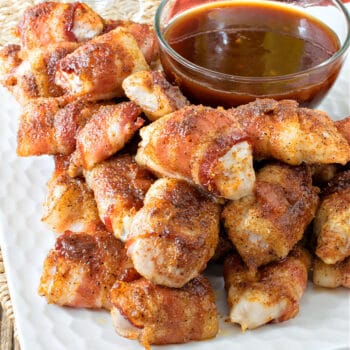
Learn how to make Pork Belly that’s tender and juicy with a crispy crackling skin! Serve it with a zesty mustard dipping sauce for the ultimate appetizer.
The Best Pork Belly Recipe
Kindly allow me to brag a little about my husband Jack…he’s made the best Pork Belly I’ve ever had! We’re sharing the recipe and all his tips and tricks with you today.
In all seriousness, I’ve tried Pork Belly many times – some homemade, some at restaurants, and it was dry and tough. I just never understood the appeal…until today.
Jack’s Pork Belly recipe is perfection! After salting the skin side of the pork belly to draw moisture out, you’ll season the meat side with a dry rub. Then oven-roast the pork – low and slow – until tender, and finish with a quick fry, skin-side down to crisp it up.
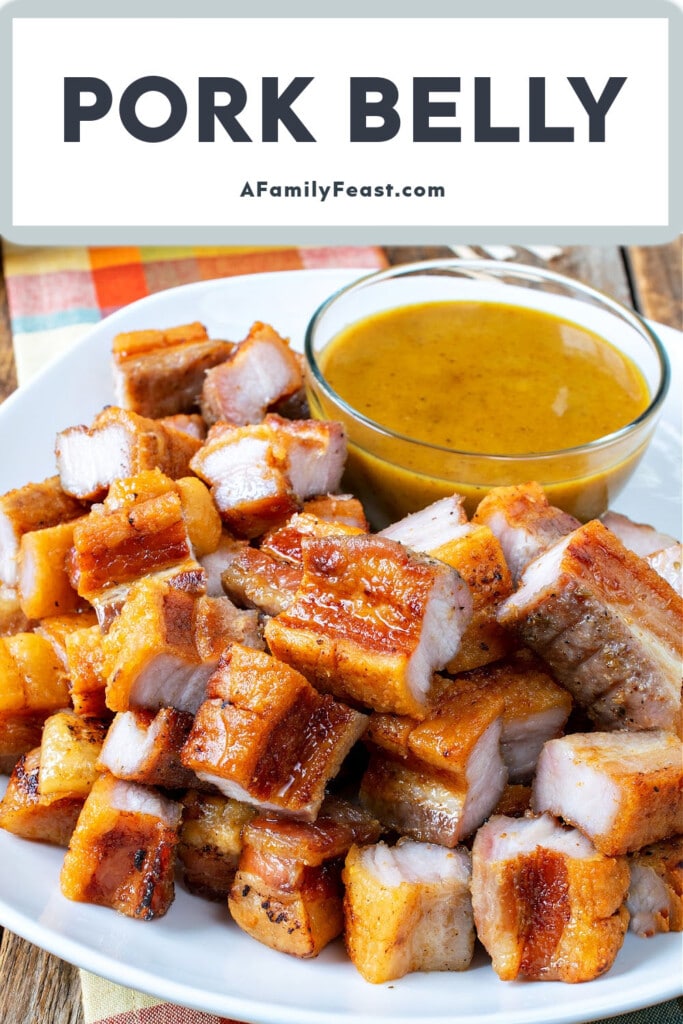
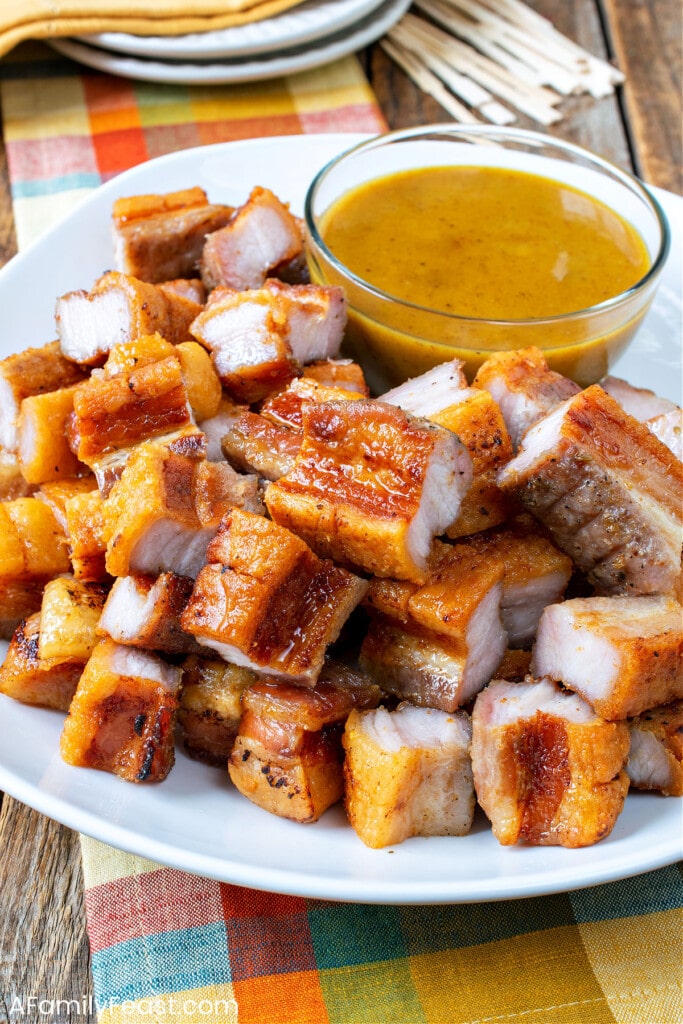
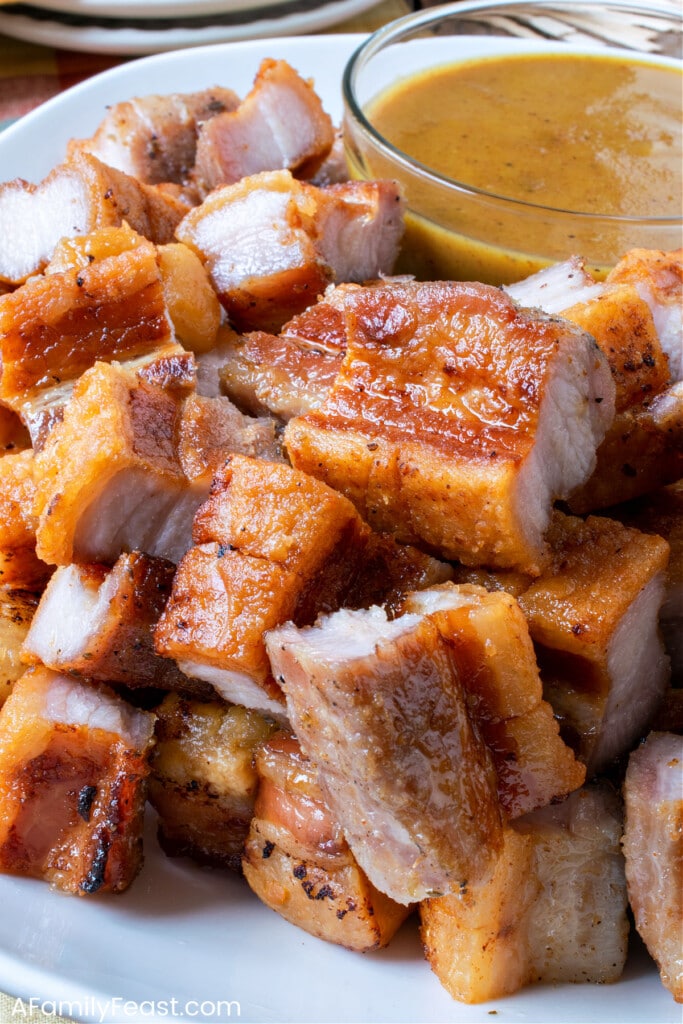
Each strip of pork belly cooks up tender and juicy with a crispy, caramelized top. After one bite, you’ll just want to keep eating these little nuggets of goodness.
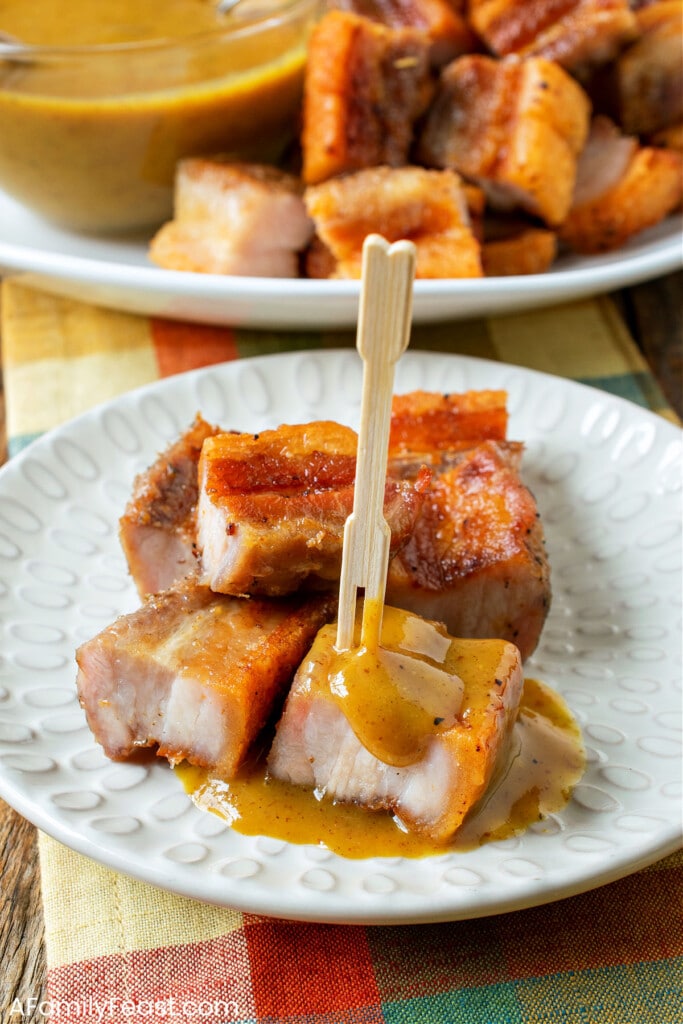
You can enjoy Pork Belly all by itself, but I highly recommend a zesty mustard sauce to serve with it for dipping. It makes the pork taste even better!
Why you'll love Fried Pork Belly
- The juicy pork and the crispy edges melt in your mouth!
- The combination of flavors of the seasoned pork and the zesty mustard dipping sauce is fantastic.
- This dish makes a great appetizer for parties, but it can also be a great entrée (minus the sauce) for a low-carb/keto diet. (We have a keto dieting friend who LOVED this dish.)
Should I cook pork belly as a whole slab or cut into strips?
Full disclosure: We found pork belly already sliced into strips at Costco a few weekends ago. The price was so good, we jumped at the chance to make this recipe.
We thought we would have preferred a center cut slab (our package of strips had a mix of center cut and end pieces), however, having the pork belly pre-cut into thick strips really didn’t make a difference in the final cooked dish.
In fact, each strip cooked up tender and juicy with nice, caramelized edges and the tops nice and crunchy. This dish came out so good, we will cut it into strips the next time too!
Key Ingredients & Substitutions
- Pork Belly – If you can buy a center cut slab or center cut slices, that will make for a better presentation because the pieces will be straight and even. However, if you have the uneven end pieces – they cook up just as well and are just as delicious as the center cut. We used everything in the package, including the ends – about 5½ pounds to start, which is a half slab. If you are cooking for a larger crowd, buy a whole slab, typically 12 pounds, and double everything in the recipe.
- Kosher Salt – Before cooking you’ll want to salt the skin side to dry it out.
- Dry Rub – The meat side is seasoned with a rub made from kosher salt, brown sugar, fennel seed (or ground fennel seed powder), garlic powder, onion powder, black pepper, paprika and oregano.
- Dipping Sauce – Made with Dijon mustard, spicy brown mustard, dry mustard, brown sugar, honey, cider vinegar, Worcestershire sauce, and cayenne pepper.
- Non-Stick Cooking Spray
- Vegetable Oil
Special Tools Needed
- Cutting Board and Sharp Knife
- Foil-lined Sheet Tray with Rack
- Small Sheet Tray or 9×13-inch Baking Dish
- Paper Towels
- Sharp Carving Knife or Serrated Meat Knife
- Needle Meat Tenderizer or Jaccard– To Poke holes in the skin.
- Instant-Read Meat Thermometer
- Large Heavy-Duty Sauté Pan
- Small Saucepan
- Various Measuring Spoons and Cups
- Whisk
- Rubber Spatula
- Tongs
- Mortar and Pestle or Spice Grinder
How do I make Pork Belly?
- 24 hours prior to cooking, poke holes and score the pork belly skin. Note that you should only poke and score just through the skin and not down through the fat and into the meat section.
- Mix the dry rub. Flip the pork skin side down on a dry clean surface and rub the spice blend over the meat bottom and sides, keeping the skin side free of any rub.
- Flip and salt the skin side of the belly, making sure salt gets rubbed into the score marks and pressed into the holes.
- Place the strips, skin side up, on a parchment covered tray or 9×13-inch casserole dish and refrigerate uncovered for 24 hours to dry out the skin. The longer the better with this process.
- 24 hours later, wipe off as much of the salt as you can with paper towels as well as any visible liquid showing on the skin.
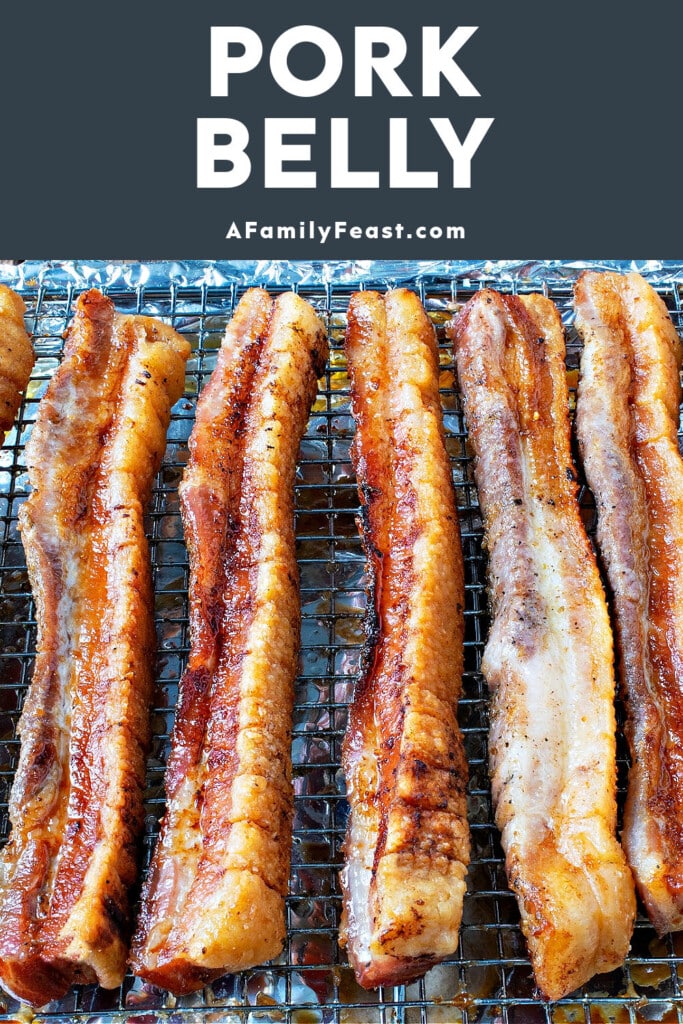
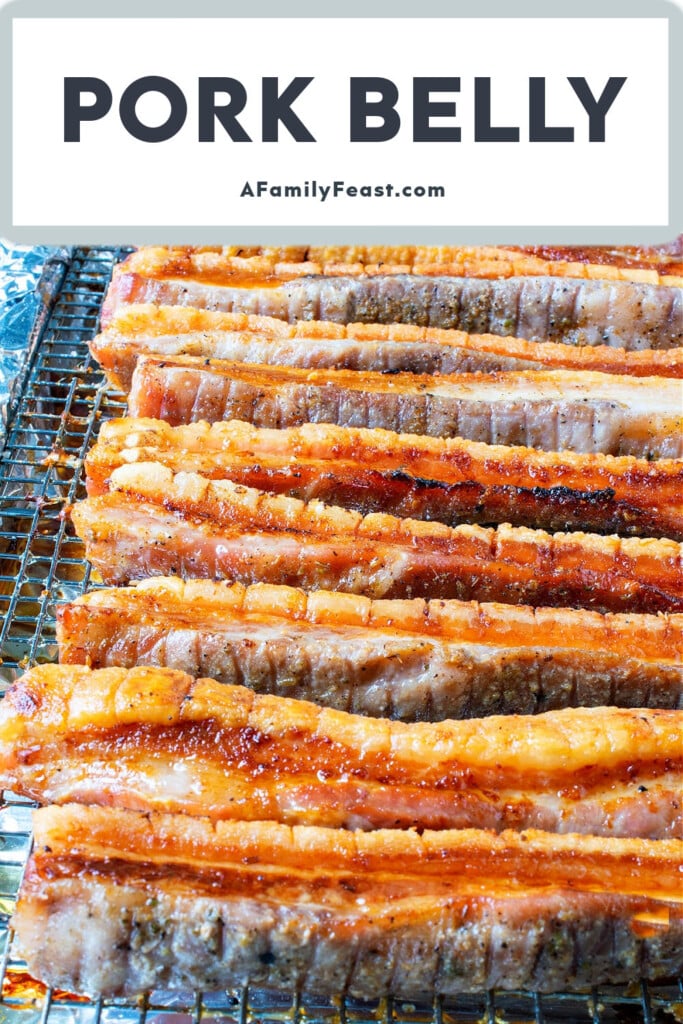
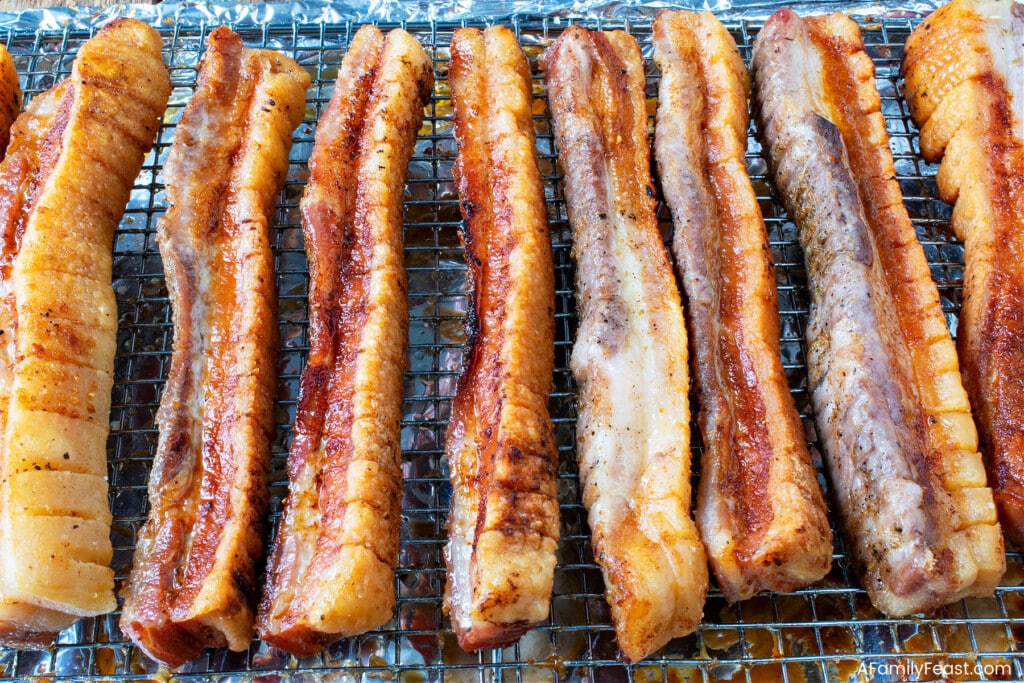
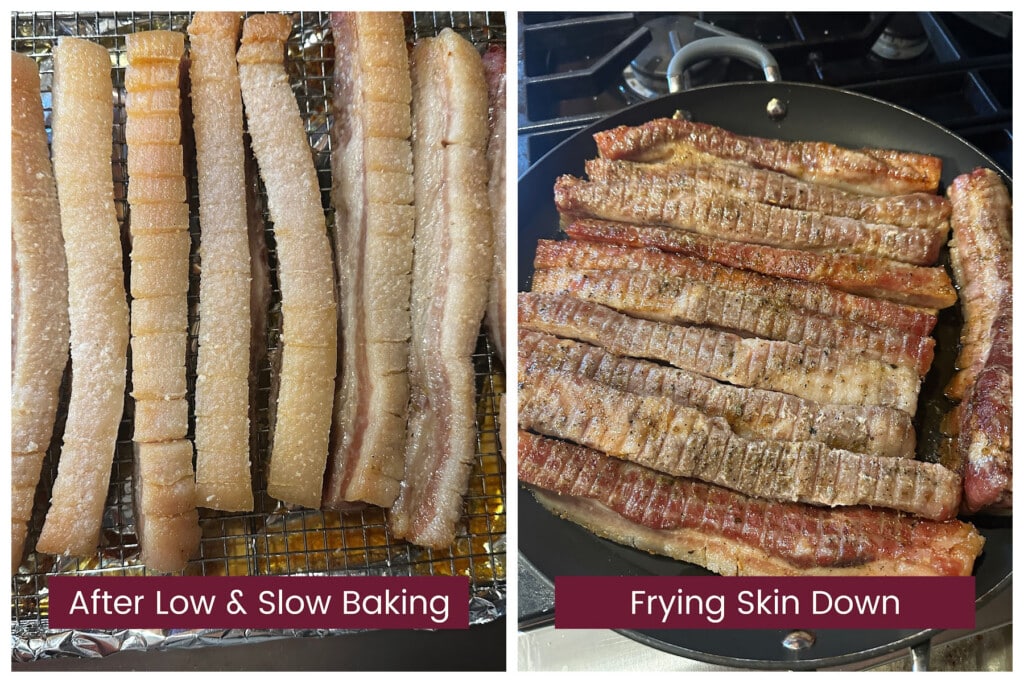
- Place the strips skin-side up on a sheet tray with rack, leaving a little space between the strips. Bake uncovered for 3½ hours.
- After baking, remove to a platter skin-side up, making sure none of the liquid from the pan bottom gets on the skin.
- Pour the fat from the pan into a glass measuring cup, adding vegetable oil, if needed, to fill to one full cup.
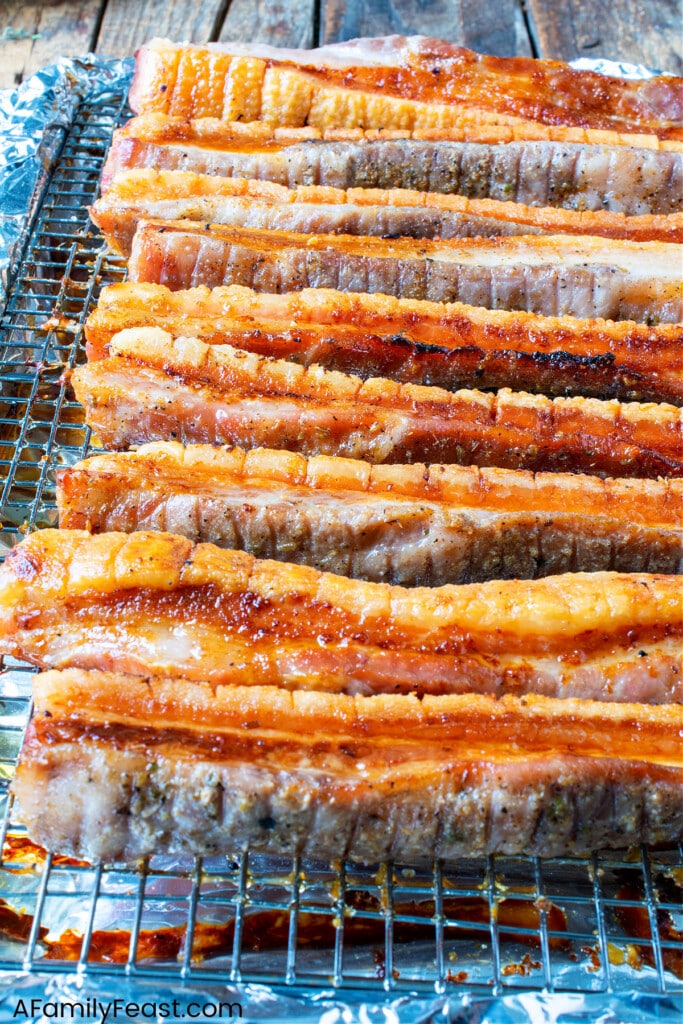
- Pour the fat into a large sauté pan with the heat off, then place the strips skin side down into the fat. Turn the burner to medium heat and cook to crisp the skin 8-12 minutes or longer. (Don’t preheat the oil – it will splatter, and you’ll burn yourself.)
- Remove the strips back to the wire rack pan and let rest uncovered for 15 minutes.
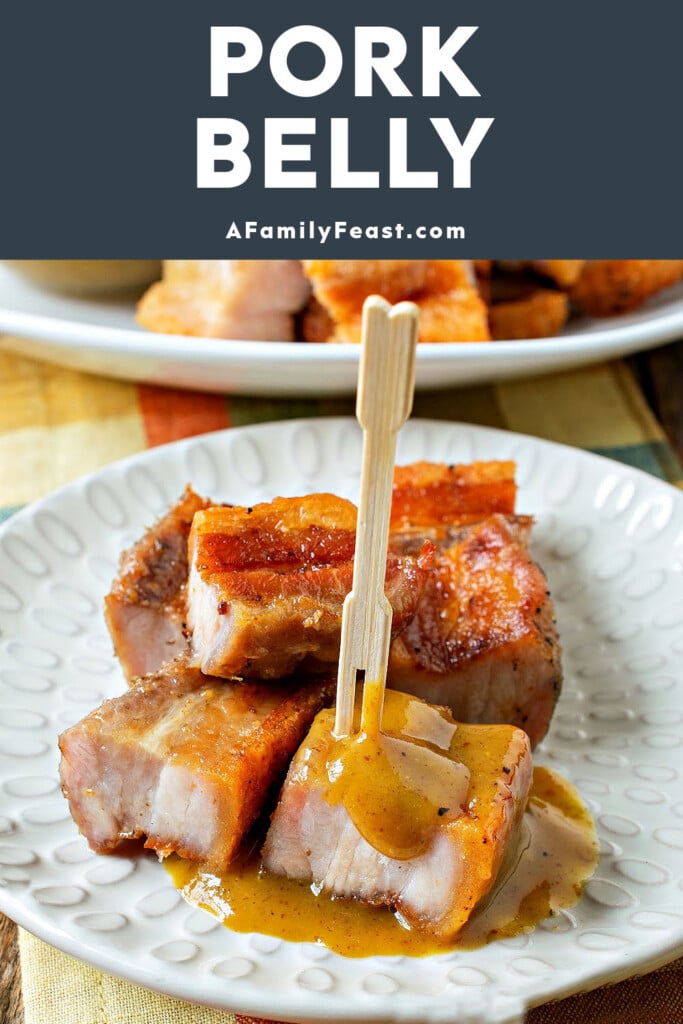
- While the pork rests, mix the sauce by combining all sauce ingredients in a small saucepan and cook for five minutes. Cool and pour into a serving bowl for dipping or spooning over the pork belly pieces.
- Transfer the strips to a cutting board and cut into bite-sized pieces through the score marks. For bigger pieces, skip every few score marks and cut. For smaller pieces, cut on every score mark.
- Serve with the sauce on the side.
Tips & Tricks
- A common mistake with pork belly is attempting to cook it at a high temperature to get the skin crisp. All this does is dry out the meat and render all the fat. Low and slow roasting is the key, followed by a quick ten-minute crisp up of the skin at the end.
- We found that cooking the pork belly in strips yielded a better overall texture and mouth feel than cooking a whole center cut belly and cutting it after it cooks. If you buy a whole belly, we recommend cutting it into one-inch-wide strips before proceeding. However, cooking it whole in 2-3 slabs will also work.
- A critical step to achieving a crispy skin is to always keep the skin dry and free from the rub that goes on the bottom and sides of the meat. The overnight salt treatment dries the skin out and after that, wiping the salt and moisture from the skin, as well as any of the rub that may have touched the skin, will result in perfectly crisp blemish free skin once fried.
- This entire process takes 24 hours so plan accordingly. The rub can sit on the meat at the same time as salting the skin.
Frequently Asked Questions
- Can I make Pork Belly ahead of time? Pork Belly is best served right after cooking. However, you could bake it ahead and then fry just before serving.
- How do I store leftovers? Store covered and refrigerated for up to three days.
- How do I reheat leftovers? To keep the skin crisp, heat some bacon fat or oil in a pan and over medium heat, cook skin side down. Or reheat in a hot oven. Avoid the microwave to preserve the crisp skin.
- Can I freeze? Yes, however thaw and reheat as mentioned above.
You might like these other Pork Recipes:


Click here for more delicious Appetizer Recipes!
Pork Belly

Learn how to make Pork Belly that’s tender and juicy with a crispy crackling skin! Serve it with a zesty mustard dipping sauce for the ultimate appetizer.
- Prep Time: 24 hours
- Cook Time: 4 hours
- Total Time: 28 hours
- Yield: 12 servings 1x
- Category: appetizer, entree
- Method: bake, fry
- Cuisine: American
Ingredients
5–6 pounds pork belly (half a slab)
2 tablespoons plus 2 teaspoons kosher salt, divided
1 teaspoon fennel seed
2 tablespoons brown sugar
1/2 teaspoon black pepper
1/2 teaspoon garlic powder
1/2 teaspoon onion powder
1/2 teaspoon paprika
1/2 teaspoon dry oregano
Sauce
1/4 cup Dijon mustard
1/4 cup spicy brown mustard (We used Gulden’s brand)
1 teaspoon dry mustard
1/4 cup brown sugar
2 tablespoons honey
2 tablespoons cider vinegar
1 teaspoon Worcestershire sauce
1/4 teaspoon freshly ground black pepper
Pinch of cayenne pepper or more if you like it hot
Instructions
- This step is to just score the skin. With a sharp serrated meat knife, cut horizontal lines across the skin about a half inch apart, just deep enough to pierce the skin but not all the way through to the fat. Using a needle meat tenderizer, or a skewer, poke holes all over the skin.
- In the opposite direction of the horizontal score marks, cut into one-inch wide strips, cutting straight through skin, fat and meat.
- Clean and dry your cutting board for the next step.
- Place the scored strips skin side down on your clean dry cutting board. (Always protect the skin from moisture or other substances.)
- In a mortar and pestle, or in a spice grinder, crush the fennel seeds with two teaspoons of kosher salt then mix in the brown sugar, black pepper, garlic powder, onion powder, paprika and oregano.
- Rub this mixture on the bottom and sides (meat side) of the strips, making sure not to get any on the skin.
- Line a medium sheet tray or a 9X13 inch casserole dish with parchment and a rack.
- Flip each piece and place onto the prepared pan.
- Use two tablespoons of kosher salt to sprinkle all over the top of the skin you just prepared. Use your fingers to work the salt into all the crevices.
- Place in the refrigerator, uncovered, for 24 hours or longer to dry out the skin. The longer the better if possible. Liquid will drip down into the pan bottom as it sits.
- Four hours before serving, preheat the oven to 250-degree F with the rack in the center of the oven.
- Take each strip and wipe as much of the top layer of salt and moisture off as possible, not letting the excess salt fall back into the pan.
- Place the strips, skin side up, back onto the rack, spacing each one so they don’t touch each other.
- Bake for 3 ½ hours uncovered. The internal temperature of a piece once tested with a probe thermometer should be about 185 degrees F.
- Move the strips to a platter to hold, uncovered and skin up. Lift the pan they were cooking on and drain the fat into a glass cup measurer. There should be about one cup of fat. Top it off with vegetable oil if not quite one cup. Try to just use the fat and not any other liquid in the pan. The fat will float so this step should be easy to separate any non fat liquid. Discard this liquid if any, as it will be very salty and not usable.
- Pour this fat into a large saute pan but do not apply heat yet.
- Lift each cooked strip and place skin side down into the fat in the pan. Turn the temperature to medium heat and let the strips crisp up for between 8-12 minutes, or longer if needed. Use tongs to lift one at about eight minutes to test for crispness. Keep cooking until all the strips are crisp.
- As they crisp, place back onto the pan with the rack, skin side up, to rest uncovered for 15 minutes.
- While the pieces rest, make the sauce by whisking all the sauce ingredients in a small saucepan and cooking over medium low for five minutes. Pour into a serving bowl once finished and cooled.
- Place the strips on your cutting board and cut them into pieces. If you like small bite sized pieces, cut at each score mark. For larger pieces, skip every couple of score marks and cut.
- Serve with the sauce on the side.