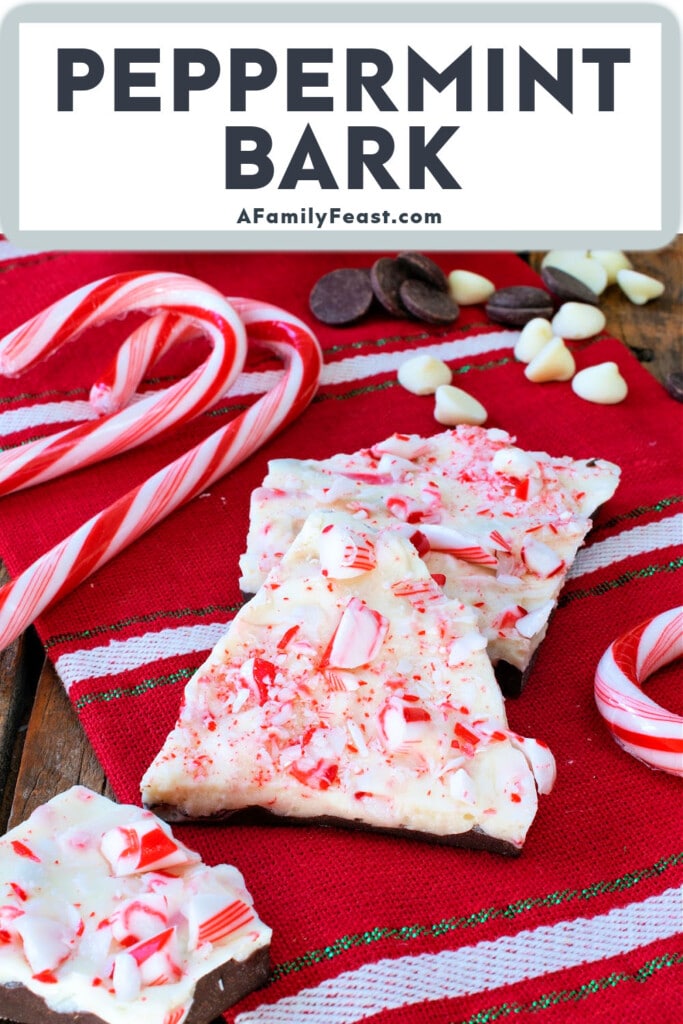
Peppermint Bark has layers of dark chocolate, white chocolate, and crushed peppermint candy canes. Make up a tray for holiday parties or gift-giving in just about an hour.

Easy Holiday Peppermint Bark
If you’re tired of baking, but still need one more sweet treat for the dessert tray – this easy Peppermint Bark recipe is for you!
This minty chocolate candy also makes a great last-minute gift idea – and it only takes three ingredients: dark chocolate, white chocolate, and candy canes.
Our recipe today is adapted from Sarah Moulton’s Peppermint Bark recipe – her recipes are always easy to follow and taste delicious.
In this recipe we’ll teach you how temper chocolate – which gives the chocolate a smooth and shiny appearance and a satisfying snap when you break the bark pieces. It’s actually easy to do – but there are a few tips and tricks that we outline below.

Why you'll love Peppermint Bark
- Peppermint candy canes and two kinds of chocolate are the perfect sweet and minty flavor combination for the holidays.
- This is an easy recipe to make with only three ingredients.
- Peppermint Bark is a great last-minute gift idea or addition to your holiday dessert table.
Key Ingredients & Substitutions
- Dark Chocolate – Buy a quality dark chocolate with 65% to 70% cacao. We used Ghirardelli brand.
- White Chocolate – Again, buy a good quality white chocolate such as Ghirardelli.
- Peppermint Candy – We suggest buying candy canes and crushing them yourself so you can have coarse pieces. Typical boxes are around 5.3 ounces each and usually contain 12 candy canes. You will use 20 candy canes in this recipe (so buy two boxes). Avoid already-crushed candy canes bits – they are usually crushed too fine, and your bark won’t have nice prominent pieces of candy.
Special Tools Needed
- Gallon Zipper Seal Bag – We place the unwrapped candy canes in a bag so the broken bites stay contained.
- Meat Mallet or Rolling Pin – To break up the candy canes into pieces. Use the flat size of the mallet so the plastic bag doesn’t rip.
- Kitchen Scale – To measure/weigh the ingredients.
- Sheet Tray – Half sheet size (13 x 18 x 1-inch)
- Aluminum Foil
- Instant-Read Thermometer or Candy Thermometer – It’s VERY IMPORTANT to have a candy or instant-read thermometer when making this recipe so that the chocolate can be tempered at the proper temperature.
- Two Medium Saucepans
- Two Medium Metal Bowls – These should fit on top of the medium saucepans but the bottoms of the bowls should not touch the bottom of the saucepans.
- Offset Spatula
- Two Rubber Spatulas – To scrape the sides of the bowls of melted chocolate.
Tips for Tempering Chocolate
- Tempering chocolate is actually very easy but it does requires a few precise steps.
- The result is a shiny finish that snaps when broken, vs a dull finish that bends if not tempered.
- After slowly melting the chocolate over a pot of hot water, more chocolate is added off heat to temper the chocolate to 88-90 degrees F. That added chocolate will melt into the melted chocolate, bring the temperature down 30 degrees and give the chocolate a nice sheen and a snap once it is cooled.
- When cooling the melted dark chocolate, only chill for 5-8 minutes. Any longer and the next white chocolate layer will not adhere to the dark.
- White chocolate melts faster than dark chocolate so remove it from the heat while there are still pieces of un-melted chocolate showing. Do not exceed 120 degrees F. Temper down to 88-90 degrees, same as the dark chocolate.
- Cool the white chocolate slightly before spreading over the chocolate so it can be spread without melting the first dark chocolate layer.
How do I make Peppermint Bark?
- Break up the candy canes into small bits and set aside. (Avoid crushing them too much.)
- Melt most of dark chocolate to 120 degrees F then add in the rest of the chocolate to temper it down to 88-90 degrees F.
- Spread onto a foil-lined sheet pan with an offset spatula. Cool for ONLY 5-8 minutes – you want the dark chocolate to only be partially set so don’t chill it for too long. If the dark chocolate sets too much, the white chocolate won’t stick to it.
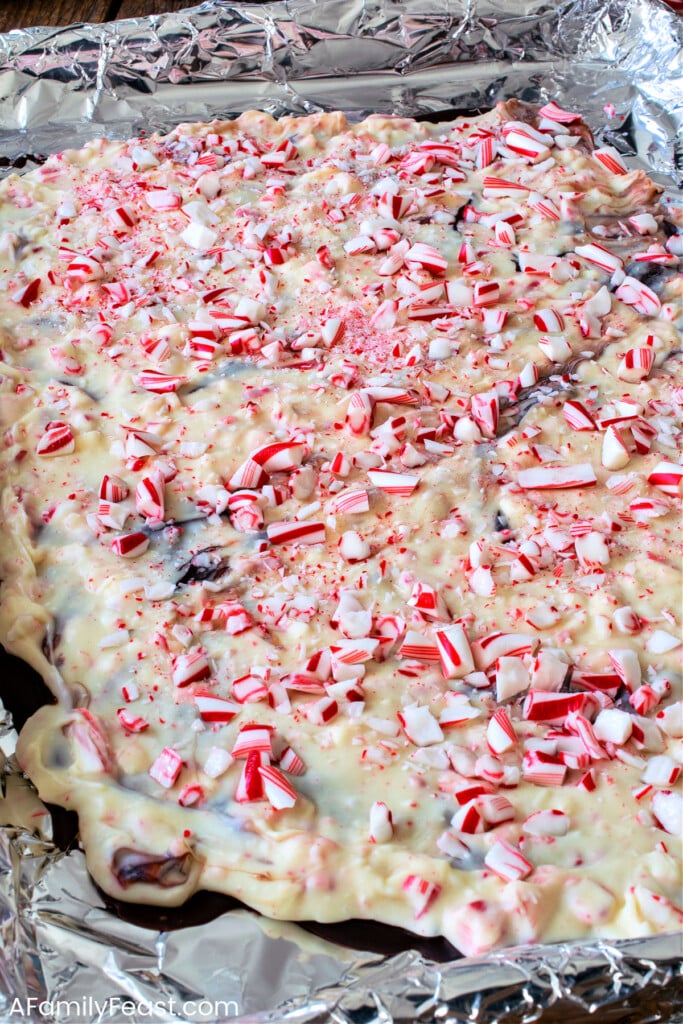
- Repeat the melting and tempering process with the white chocolate, then stir in most of the crushed candy canes, setting some of the bigger pieces aside to decorate the top.
- Spread white chocolate over the chilled dark chocolate with the offset spatula.
- Press the remaining broken candy canes onto the top of the white chocolate.
- Chill for 30 minutes.
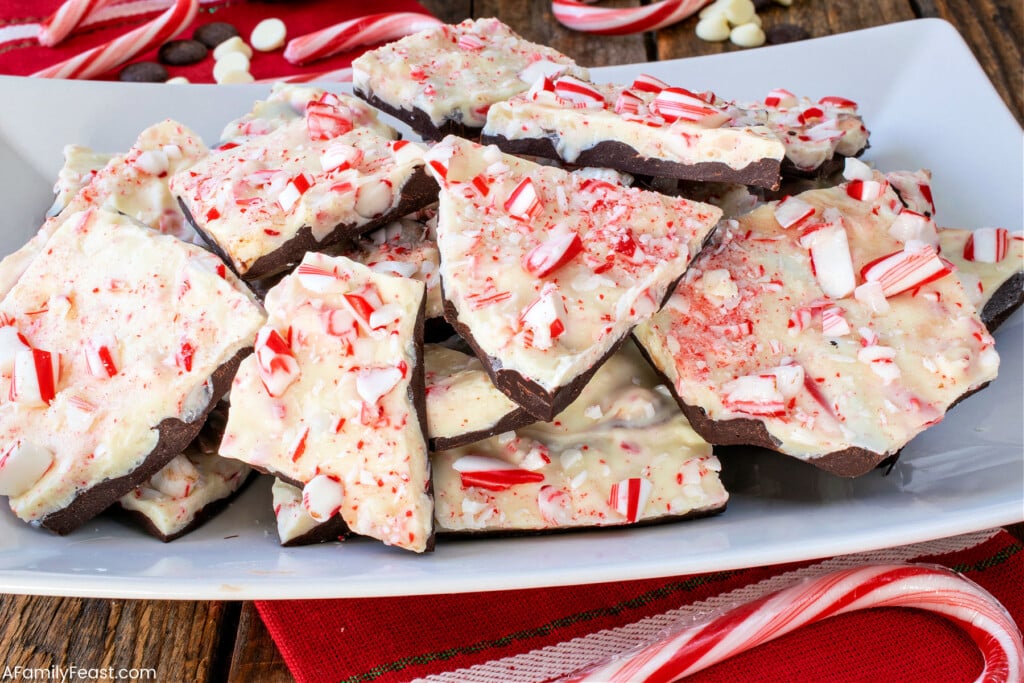
- Once chilled and firm, break the bark into small to medium pieces of various sizes and shapes.

Frequently Asked Questions
- Can I make Peppermint Bark ahead of time? Yes, the bark needs to chill at least 30 minutes before breaking into pieces.
- How do I store leftovers? This will last longer when refrigerated but can be left at room temperature for several days if the indoor temperature is not too warm.
- Can I freeze? We advise against it. Over time, frozen chocolate will start to bloom, leaving white spots and streaks in the chocolate.
You might like these other Peppermint Recipes:


Click here for more delicious Candy Recipes!
Peppermint Bark

Peppermint Bark has layers of dark chocolate, white chocolate, and crushed peppermint candy canes.
- Prep Time: 1 hour
- Cook Time: 15 minutes
- Total Time: 1 hour 15 minutes
- Yield: 10 portions 1x
- Category: candy, Dessert
- Method: melt
- Cuisine: American
Ingredients
2 5.3-ounce boxes of candy canes (You will need approximately 20 standard-sized candy canes)
1 pound dark chocolate, divided
1 pound white chocolate, divided
Instructions
- Line a sheet tray with foil. Set aside.
- Break the candy canes into pieces with a meat mallet or a rolling pin. Try not to crush the candy canes into super small pieces. Reserve one quarter of the broken pieces.
- Heat a saucepan of water to boiling then lower to a simmer and place a bowl larger than the pan opening over the top. Make sure the bottom of the bowl does not come in contact with the water below.
- Add 14 of the 16 ounces of dark chocolate. Stir continually until melted and at 120 degrees F when checked with a candy or probe thermometer. Immediately remove from heat and stir in the remaining two ounces of chocolate. Keep stirring until melted and the final temperature is between 88-90 degrees F.
- Pour it out onto the prepared pan and spread to 1/8th inch thick with an offset spatula. No need to make the edges neat since the candy will be broken into pieces later.
- Place the pan in the refrigerator for 5-8 minutes to cool, no longer.
- Repeat with the white chocolate, (14 ounces now and two ounces later) just be careful since white chocolate melts faster than dark chocolate. Keep checking the temperature and do not let it rise above 120 degrees F. Continue stirring off heat until melted. Add the reserved two ounces of white chocolate and stir off heat until melted and the chocolate temperature is between 88-90 degrees F.
- Stir in the larger amount of the broken candy canes.
- Assuming the white chocolate and broken candy cane mixture is not still hot, spread over the chilled dark chocolate to the edges. (If the white is too warm, it will melt the dark chocolate and make it hard to keep the two layers from melting together).
- Immediately press in the remaining broken candy canes across the top, making sure the pieces touch the wet chocolate.
- Chill 30 minutes then break into pieces and serve.
- Leftover bark can be stored in a covered container at room temperature as long as the room temperature is not too warm. Having said that, this bark will last longer if kept refrigerated.


Hi Jack and Martha!
I haven’t made this as of yet but plan to … I know I will probably eat most of it!! Hoping you and your families have the best Christmas ever and a bountiful New Year!
Thank you so much Doris! Merry Christmas to you too!