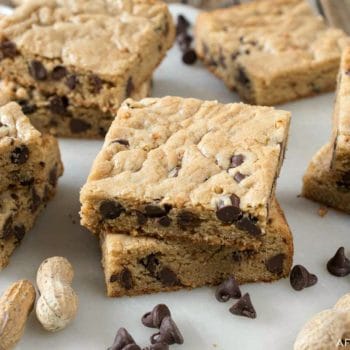
Chocolate Chip Peanut Butter Blondies combine chocolate chips in an easy peanut butter cookie bar.

Anyone who loves the flavor combination of chocolate and peanut butter together will love these easy Chocolate Chip Peanut Butter Blondies.
These delicious peanut butter-infused blondies are both cakey and chewy in every bite – the perfect texture for a blondie or a brownie (in my opinion)! Served with a cold glass of milk…you’ll be in dessert heaven!

How do you make Chocolate Chip Peanut Butter Blondies?
You’ll start by lining a square 9×9-inch pan with two strips of parchment paper that have been cut down to the width of the pan. Place the strips criss-cross in the pan – leaving the ends long enough that you’ll have “paper handles” extending up the sides of the pan. This will help you lift the baked blondies out of the pan once they are baked – making it easier to cut them into squares.
Next, you’ll combine melted butter, peanut butter (smooth or crunchy – your choice), and both granulated and brown sugar in a mixing bowl.
Add eggs, one at a time, to the mixing bowl, along with vanilla extract and a pinch of salt.
At this point, switch to hand mixing – and slowly stir in flour and baking powder a little at a time to the peanut butter mixture. Also add in the chocolate chips as you stir in the last of the flour – making sure to stir just enough to combine – but don’t over mix the batter. (Over mixing will develop the gluten in the flour, giving these Chocolate Chip Peanut Butter Blondies a tougher texture.)

Pour the batter into the parchment-lined pan, then bake your Chocolate Chip Peanut Butter Blondies for about 20 to 25 minutes – until the edges are just lightly golden brown. It’s OK if the center still seems very soft – the blondies will firm up as they cool, but they will still be chewy in the center.
Place the pan on a cooling rack. Once the blondies are firm enough (about 10 minutes or so), use the parchment paper “handles” to take the uncut brownies out of the pan and back onto the rack to finish cooling completely.

Cut the Chocolate Chip Peanut Butter Blondies into nine large squares or sixteen smaller pieces for serving. Don’t forget the glass of milk!
You may enjoy these other chocolate-peanut butter desserts:
- Chocolate Chip Peanut Butter Pie
- Chocolate Peanut Butter Bon Bons
- Chocolate Peanut Butter Cupcakes
- Chocolate Peanut Butter Pie
- Chocolate Peanut Butter Cheesecake Bites
Chocolate Chip Peanut Butter Blondies
Chocolate Chip Peanut Butter Blondies combine chocolate chips in an easy peanut butter cookie bar.
- Prep Time: 15 minutes
- Cook Time: 20 minutes
- Total Time: 35 minutes
- Yield: 9 servings 1x
- Category: dessert
- Method: baking
- Cuisine: American
Ingredients
1 cup all-purpose flour
1 1/2 teaspoons baking powder
1/3 cup unsalted butter, melted and cooled slightly
1/2 cup crunchy peanut butter (we used Skippy Extra Crunchy)
2/3 cup granulated sugar
1/3 cup brown sugar
2 large eggs
1 teaspoon vanilla extract
Pinch of salt
1 cup semi sweet chocolate chips
Instructions
- Preheat oven to 350 degrees F.
- Line a 9×9-inch square pan with two sheets of parchment paper, trimmed and placed one across left to right, then top to bottom, making sure that the edges of the paper are large enough to extend up the sides of the pan. (This will make it easier to lift the baked blondies out of the pan to cut.) Set pan aside.
- In a small bowl, whisk together flour and baking powder to combine. Set aside.
- In the bowl of a mixer, combine melted butter, peanut butter, and both sugars. Mix well, scraping the sides and bottom of the bowl as needed.
- Add eggs to the mixing bowl, one at a time, mixing well after each addition. Add vanilla extract and salt and mix one more time to combine. At this point, you are done with the mixer.
- One third at a time, slowly fold the flour mixture into the peanut butter mixture, stirring just enough to incorporate the flour after each addition. When you add the last third of the flour mixture, also add the chocolate chips and gently stir just until combined and the chips are evenly dispersed throughout the batter.
- Spoon the batter into the prepared pan, spreading evenly to the corners. Bake for 20-25 minutes, until the edges are lightly golden brown and the inside is just set. (The middle will still be soft to the touch – it will firm up a bit as it cools.)
- Place pan on a cooling rack and allow the blondies to firm up for about 10 minutes. Use the parchment paper handles to carefully lift the blondies back onto the cooling rack. Once completely cool, cut into 9 large (3 rows x 3 rows) or 16 smaller pieces (4 rows x 4 rows).


Cooking time is wrong, looked on other sites that had 35-40 minutes
Hi Tracey – We didn’t follow any other recipes so what they have listed is not really applicable here…feel free to bake for 35 to 40 minutes, but you will probably end up with dry and overdone brownies.
Hi, can I make the batter one night before baking, and leave in the fridge? To be cooked the next morning
Yes – that should work fine Sophie!
Very east to follow! My 2 and 4 year Olds helped me out. They’re in the oven now. With my MANY distractions, I forgot the salt. Hopefully they’ll still turn out good! Thanks for posting!
You should be OK without the salt (it just enhances the sweetness a bit). Enjoy!
These are magic. The texture is perfect and you can’t go wrong with PB and chocolate together. They received a chef’s kiss from someone when brought to a gathering. They also work well with DF butter.
Thanks Bren!
Yummy! I love your recipes. Everything I make turns out delicious.
Thanks Jill – We’re so happy to here that! 🙂
Hi – I made these in an 8×8 pan, I baked them for an extra five minutes – in a convection oven. When they came out they were not solid in the middle, I put them back in for another 5. So 10 additional minutes beyond the suggested time. I cooled them for 10. Took them out of the pan and they fell apart. Totally raw in the middle. Any suggestions? Thanks.
Hi Leigh – I’m guessing that by using an 8×8-inch pan rather than 9×9-inch resulted in thicker bars since the pan dimensions are smaller – they probably just needed more time to bake.
I love your website, beautiful pictures. The best site I have seen.
Thank You
Donna
Thank you so much Donna! (You made my day!)